What are the Markings on a Tape Measure: Essential Guide
Have you ever picked up a tape measure and wondered about all those little marks and numbers? If you’ve found yourself puzzled by the markings on a tape measure, you’re not alone.
Understanding these markings can seem confusing at first, but once you grasp their purpose, you’ll find yourself measuring with confidence and precision. Tape measures are essential tools for everything from home improvement projects to professional construction work. But to truly make the most of this handy tool, you need to know what each marking means.
You’ll uncover the secrets behind those lines and numbers, helping you transform your measuring skills and ensuring your projects are spot-on every time. Don’t let uncertainty hold you back; dive into this guide and take control of your measuring adventures!
Basics Of A Tape Measure
Understanding the basics of a tape measure is like unlocking a secret code. If you’ve ever been puzzled by the markings and numbers on this essential tool, you’re not alone. Learning how to read a tape measure can transform your DIY projects or professional tasks from frustrating to efficient.
A tape measure is a simple yet powerful tool. It’s made up of a flexible ruler and is used to measure distance. These tools are essential for carpentry, sewing, and various DIY projects. As you unravel the tape, you’ll notice numbers and symbols that can be quite perplexing.
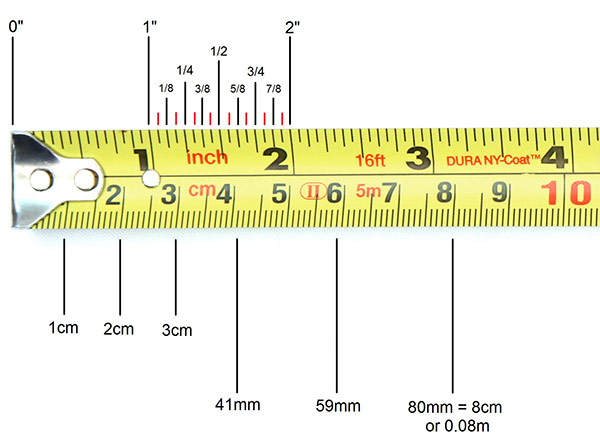
Most tape measures come in two units: inches and centimeters. You’ll often find a dual scale on the tape, making it versatile for different measurement needs. The numbers on the tape correlate directly to the length you’re measuring, but what about those tiny lines?
Understanding The Small Markings
The small markings between the numbers are crucial for precision. These lines represent fractions of an inch or millimeter. Often, the longest line represents half an inch, while the shorter ones may represent quarters, eighths, or even sixteenths of an inch.
This detail is vital when you need accuracy. Imagine you’re building a shelf and need to cut wood precisely—those smaller markings ensure your cuts are spot on. Missing these could result in a wobbly or uneven structure.
Using The Hook For Accuracy
That little metal hook at the end of your tape measure isn’t just a stopper. It’s designed to compensate for its own thickness. When you’re measuring an inside edge, it pushes in; for an outside edge, it pulls out. This ensures your measurements are exact.
Have you ever wondered why your measurements don’t add up? It could be because you overlooked this feature. Always check your tape measure’s hook before taking a reading.
The Mystery Of Red Numbers
Ever noticed red numbers on your tape measure? These numbers typically mark every foot or meter, depending on the unit system. They help you keep track of larger measurements without losing count.
Visualizing your space in these larger increments can make the task less daunting. If you’re planning to rearrange your living room, these red numbers can help you envision the space’s dimensions more clearly.
Next time you pick up a tape measure, take a moment to look closely. What markings do you see? How could understanding them change the way you work? Dive into the details and discover the difference they make in your projects.
Credit: www.carpentry-tips-and-tricks.com
Inch And Centimeter Markings
Tape measures often feature markings in inches and centimeters. These markings help users measure objects accurately. Each mark represents a unit of measurement, making it easier to determine the length or width of an item.
Understanding the markings on a tape measure can transform your DIY projects from frustrating to fulfilling. The most common markings you’ll encounter are inches and centimeters. Knowing how to read these can make your measurements accurate and your projects seamless.Inch Markings
Inch markings on a tape measure are the backbone of measuring in the United States. Each inch is typically divided into smaller fractions—halves, quarters, eighths, and sixteenths. This division helps you get precise measurements for tasks like cutting wood or sewing fabrics. You’ll often see the numbers in bold for each inch, making it easy to spot. Smaller lines between these numbers represent fractions. If you’ve ever struggled with fractions, using these markings can make them feel less intimidating. Consider a time you tried to hang a picture frame. Knowing exactly where to place the nail with inch measurements can make the difference between a straight gallery wall and a lopsided disaster.Centimeter Markings
Centimeter markings are standard in countries using the metric system. Each centimeter is divided into ten smaller parts, called millimeters. This decimal system can be easier to work with, especially for quick calculations. Centimeters are marked with numbers, and each millimeter has a smaller line. If you’re working on a project that involves international standards, these markings are essential. Imagine crafting a piece of furniture that needs to fit perfectly in a space defined by centimeters. Knowing how to read these markings ensures your hard work results in a piece that fits like a glove.Choosing The Right Markings
Do you often find yourself confused about which side of the tape measure to use? Consider the project at hand. For a home project in the US, inch markings might be your go-to. Meanwhile, if you’re following a European recipe or blueprint, centimeters could be more suitable. What’s your comfort zone? Some people find the metric system more intuitive, while others stick to inches out of habit. Experiment with both to see which feels more natural for your needs.Practical Tips For Using Tape Measure Markings
Always start your measurement from the 0 mark to ensure accuracy. Keep the tape straight and level to avoid skewed results. Double-check your measurements, especially for critical cuts or placements. Do you have a preference for one system over the other? Share your experience next time you tackle a project. Your insights could be just what someone else needs to master their tape measure skills.Understanding Fractional Increments
Understanding the markings on a tape measure is essential. These markings guide you in taking accurate measurements. They often include fractional increments, which can be confusing. But with a bit of practice, they become easy to read.
Common Fractional Measurements
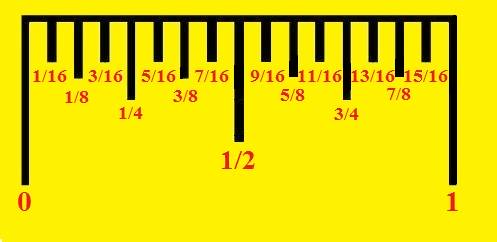
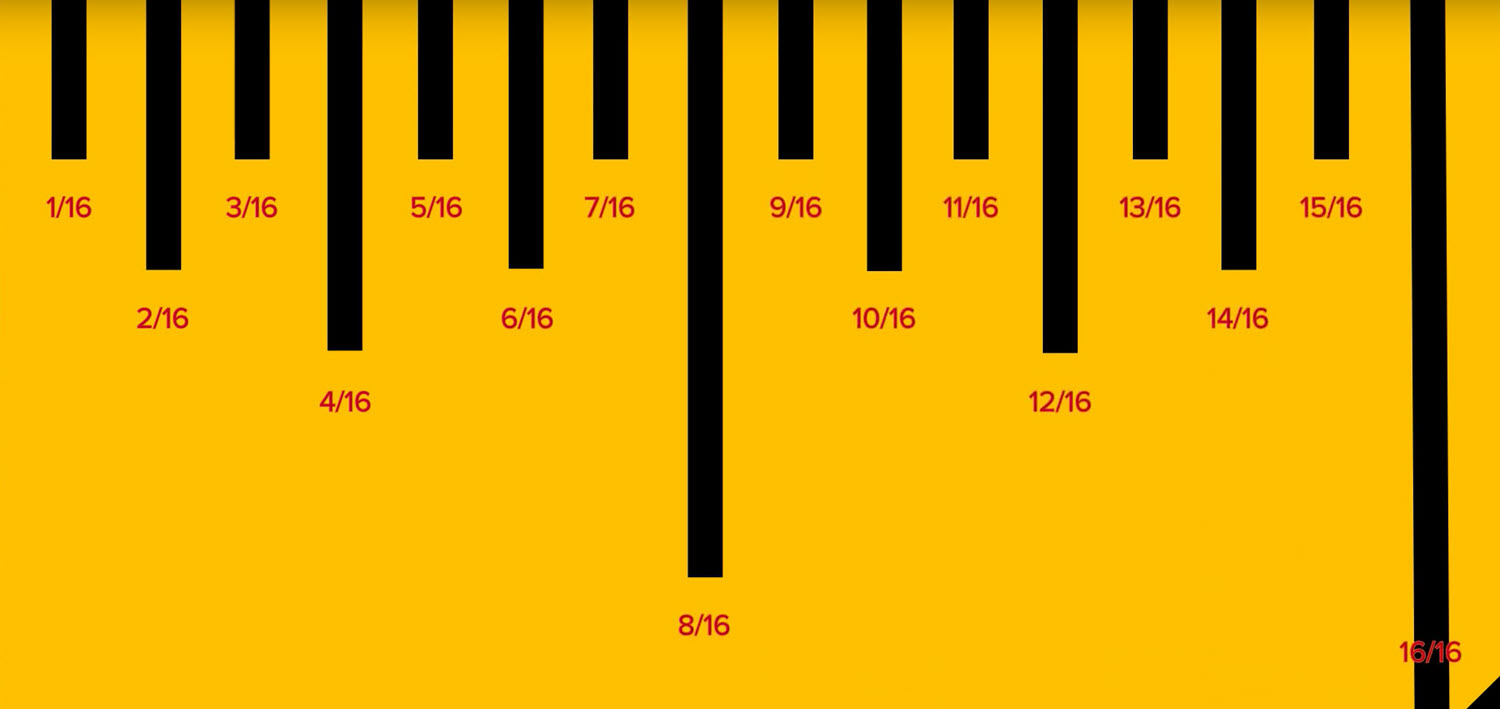
Most tape measures use fractions to show precise measurements. The most common increments are halves, quarters, eighths, and sixteenths. These fractions divide the inch into smaller parts. Each line on the tape measure represents a fraction.
The longest line marks the whole inch. The second longest represents the half-inch. Smaller lines show quarters and eighths. The shortest lines show sixteenths. Recognizing these fractions helps in taking accurate measurements.
Reading The Fractions
Reading fractions on a tape measure requires focus. Start by identifying the longest line. This line shows a full inch. Move to the next line for half-inch increments. The next longest lines are quarters. They split the inch into four parts.
Look at the smaller lines for eighths and sixteenths. Eighths divide the inch into eight parts. Sixteenths divide it into sixteen parts. Understanding these lines helps in noting precise measurements. Practice improves your speed and accuracy.
Metric System Markings
Understanding the markings on a tape measure is crucial for anyone involved in DIY projects or professional building work. The metric system, widely used around the world, brings precision with its straightforward units. Whether you’re measuring a piece of wood for a shelf or checking the dimensions for a new garden plot, these markings guide you accurately. Let’s dive into the metric system markings on your tape measure and see how they can simplify your measuring tasks.
Millimeters And Centimeters
When you first look at a tape measure with metric system markings, you’ll notice numbers that are separated by tiny lines. These small lines represent millimeters. Millimeters are the smallest metric unit on a tape measure, giving you precise control over your measurements.
Every tenth millimeter is marked by a longer line, indicating centimeters. Centimeters are useful for measuring larger objects, and they help you quickly gauge dimensions without needing to count each millimeter. Imagine you’re measuring the width of a book; you can say it’s about 20 centimeters instead of painstakingly counting 200 millimeters.
Next time you’re measuring something, notice how these metric units provide clarity. They eliminate guesswork and allow for exact results, making your project outcomes more reliable.
Converting Between Systems
Sometimes, you might encounter a situation where you need to convert between metric and imperial systems. This can happen if you’re working on an international project or collaborating with someone using different units. The question is, how can you do this easily?
To convert centimeters to inches, remember that one inch equals 2.54 centimeters. So, if you measure something as 10 centimeters, you can divide by 2.54 to get the equivalent in inches, which is roughly 3.94 inches. This conversion is handy when you need to switch between systems, ensuring you maintain accuracy across measurements.
Have you ever tried converting measurements on the fly and ended up confused? By keeping this conversion factor in mind, you can avoid errors and make confident decisions, whether you’re crafting a new piece of furniture or planning a room renovation.
What other techniques have you found helpful when switching between measurement systems? Share your thoughts and tips in the comments below!
Specialty Markings
Understanding the specialty markings on a tape measure can transform your DIY projects from frustrating to fantastic. These markings are like secret weapons embedded in your tool, waiting for you to discover their power. Whether you’re building a new shelf or simply hanging a picture frame, knowing these markings can save you time and effort.
Stud And Joist Indicators
Have you ever wondered why some tape measures have little black diamonds or triangles at certain intervals? These are stud and joist indicators, usually found every 16 inches. This spacing aligns with the standard distance between wall studs and floor joists in most homes.
Knowing this can be a game-changer. Imagine you’re installing a new cabinet and need to secure it to the studs. These indicators can help you pinpoint stud locations without needing a stud finder. It’s a simple yet effective way to ensure your projects are secure and stable.
Black And Red Numbers
While measuring, you might notice black and red numbers on your tape measure. Black numbers typically denote inches, while red numbers often indicate feet. This color coding helps you quickly differentiate between measurements, especially in larger projects.
Picture yourself measuring a long piece of wood. The red numbers can instantly tell you how many feet you’re dealing with, avoiding confusion and potential miscalculations. This saves time and helps maintain accuracy, ensuring your project doesn’t end in frustration.
Have you ever overlooked these specialty markings? Recognizing their importance can change the way you approach DIY tasks. Next time you grab your tape measure, look closer and see what insights it can offer. Are there other hidden features on your tools that you haven’t discovered yet?
Credit: learn.reeb.com
Accuracy And Calibration
Tape measures have various markings for precise measurements. These include inch, centimeter, and millimeter lines. Some feature red numbers at foot intervals and black diamonds for truss layouts. Understanding these markings ensures accurate measurements and proper calibration in construction and DIY projects.
Accurate measurements are crucial in any project, whether you’re building a bookshelf or crafting a DIY masterpiece. Tape measures are essential tools, but their effectiveness hinges on accuracy and proper calibration. Understanding how to maintain and ensure the precision of your tape measure can make a significant difference in the quality of your work. Let’s explore how to achieve this.Ensuring Accurate Measurements
Accurate measurements begin with a well-calibrated tape measure. Always start measuring from the 1-inch mark to avoid errors from the metal hook. This small adjustment can prevent discrepancies due to wear and tear at the tape’s end. Check the alignment of the tape’s markings with a ruler. If you notice any misalignment, it’s time to recalibrate or even replace your tape measure. Consistency in your tools ensures consistency in your projects.Regular Maintenance Tips
Regular maintenance keeps your tape measure reliable. Clean the tape with a soft cloth to remove dust and debris. This prevents build-up that could affect the tape’s readability. Inspect the metal hook and spring mechanism regularly. If the hook is bent or the spring is weak, it can lead to inaccurate measurements. Small repairs or replacements can save you from costly mistakes later. Store your tape measure in a dry place. Moisture can cause rust, affecting the tape’s smooth retraction and longevity. A little care goes a long way in maintaining the tool’s accuracy. Have you ever completed a project, only to find it doesn’t fit quite right? It might be due to an inaccurate tape measure. By focusing on accuracy and regular maintenance, you ensure your tools work for you, not against you. What steps will you take to ensure your tape measure is as precise as possible?Choosing The Right Tape Measure
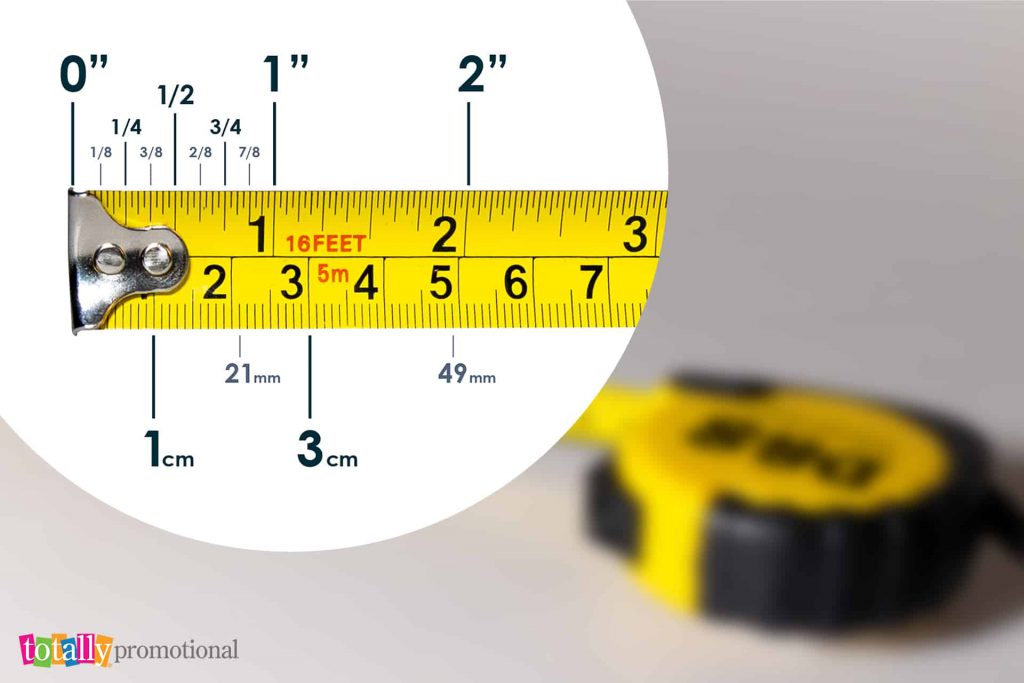
Choosing the right tape measure can make your projects easier. Different tape measures have unique features. Knowing these features can help you pick the best one for your needs.
Types Of Tape Measures
Tape measures come in several types. The most common is the pocket tape measure. It fits easily in your hand and is perfect for quick measurements. Another type is the long tape measure. It is ideal for measuring large areas, like rooms or gardens. Laser tape measures use technology to measure distances accurately. They are often used in construction. Each type serves a different purpose.
Features To Consider
Several features can affect your tape measure choice. Check the length of the tape. A longer tape measure is better for bigger projects. Look at the markings. They should be easy to read. Some have both metric and imperial units. This feature is helpful for international projects. Consider the material too. Steel tapes are durable, while fiberglass tapes resist stretching.
Consider the lock mechanism. It helps hold the tape in place. Some people prefer a magnetic hook. It sticks to metal surfaces, making measurements easier. Lastly, think about the price. A good tape measure should fit your budget and meet your needs. Choose wisely for better results.
Credit: blog.totallypromotional.com
Practical Tips For Use
Understanding the markings on a tape measure can significantly enhance your DIY projects and daily tasks. A tape measure might seem straightforward, but the nuances in its markings can make a big difference in precision and efficiency. Let’s dive into some practical tips to ensure you’re using your tape measure to its fullest potential.
Avoiding Common Mistakes
It’s easy to overlook the small details when using a tape measure. Remember that the hook at the end is designed to move slightly to account for its thickness, ensuring accurate measurements whether you’re pushing or pulling the tape. Be aware of this feature; it’s not a sign of wear but a clever design element. Double-check the starting point of your measurement. It’s a common mistake to start from the wrong mark, leading to errors in your project.
Enhancing Measurement Precision
Precision is key, especially in tasks requiring tight tolerances. Use the tape measure on a flat surface to prevent bending, which can distort the measurement. Consider using the metric system for greater precision in smaller increments. You might find it challenging at first, but many professionals prefer this method for its accuracy. Remember to keep the tape measure taut. A slack tape can give inaccurate readings, affecting the outcome of your project.
Have you ever thought about marking the measurement directly on the object you’re measuring? This simple tip can save you time and prevent mistakes. It’s a small habit but can make a huge difference, especially when you’re in the middle of a complex project.
So, how can these tips transform the way you approach your next project? Embrace these insights and see how a tape measure can be more than just a tool—it’s a gateway to precision and efficiency.
Frequently Asked Questions
What Do The Numbers On A Tape Measure Mean?
The numbers on a tape measure represent measurements in inches or centimeters. Large numbers typically indicate inches, while smaller numbers show fractional inches or millimeters. Understanding these numbers helps in accurate measurements for various tasks.
Why Are There Red Numbers On A Tape Measure?
Red numbers or markings often indicate specific increments, like 16-inch or 24-inch centers. These are commonly used in construction for framing and layout. They help ensure consistent spacing and alignment.
What Are The Small Lines On A Tape Measure?
The small lines represent fractions of an inch. Each line between whole numbers divides the inch into smaller parts, usually down to 1/16th of an inch. These fractions allow for precise measurements in detailed projects.
How Do You Read Metric Markings On A Tape?
Metric markings are in centimeters and millimeters. Each centimeter is divided into 10 millimeters. The larger numbers indicate centimeters, while the smaller lines between them represent millimeters. This system provides precision in metric measurements.
Conclusion
Understanding tape measure markings is essential for accurate measurements. Basic knowledge helps in daily tasks, whether you’re crafting or building. Remember, each mark has a purpose. Use them wisely. This ensures precise work, saving time and effort. Practice reading your tape measure often.
Familiarity breeds confidence and skill. With this guide, you’re better equipped for projects. Happy measuring!