How Do You Condition Straw Bales for Planting: Expert Tips
Imagine stepping into your garden and witnessing a lush, green paradise growing from simple straw bales. It might sound like magic, but it’s entirely possible with a technique called straw bale gardening.
If you’re curious about how you can transform dry, lifeless straw bales into a fertile foundation for your plants, you’re in the right place. Conditioning straw bales is a crucial step in this process, and understanding how to do it can unlock a whole new realm of gardening possibilities for you.
You might be wondering why straw bale gardening has gained popularity among gardening enthusiasts. The answer lies in its simplicity and efficiency. It offers solutions to common gardening problems like poor soil quality, limited space, and pesky weeds. However, to harness these benefits, conditioning your straw bales is key. This article will guide you through the simple steps you need to turn straw bales into thriving mini-gardens. You’ll discover how this technique can revolutionize your gardening experience, making it easier, more productive, and incredibly rewarding. So, if you’re ready to learn the secrets behind conditioning straw bales and setting the stage for a fruitful harvest, keep reading. Your garden’s transformation starts here.
Basics Of Straw Bale Gardening
Straw bale gardening is a unique method to grow plants. It uses straw bales as the growing medium instead of soil. This technique is perfect for those with limited space or poor soil. It’s easy, cost-effective, and sustainable. Straw bales provide a great alternative to traditional gardening. They offer good drainage and warmth for plant roots. Conditioning the straw bales is essential for successful planting.
Basics Of Conditioning Straw Bales
The first step is soaking the bales thoroughly. Water the bales each day for about three days. This helps begin the decomposition process. Straw bales need to decompose slightly for nutrients to be available. After soaking, add nitrogen-rich fertilizer. This boosts the breakdown of straw into compost. Continue watering and fertilizing for around ten days. The bales will heat up as they decompose.
Maintaining Moisture In Straw Bales
Proper moisture is vital in straw bale gardening. Bales should be kept damp but not too wet. Check the moisture levels frequently. Water the bales regularly, especially during dry spells. Straw bales can dry out quickly. Ensure they stay moist for healthy plant growth. Moisture aids in maintaining the right temperature and nutrient flow.
Temperature Control In Straw Bales
Temperature plays a crucial role in straw bale conditioning. The internal heat of bales should reach about 100°F. This indicates the decomposition is active. Monitor the temperature using a thermometer. Ensure it stays consistent and does not drop. A steady temperature helps break down the straw faster. Proper temperature aids in creating a rich planting medium.
Choosing The Right Straw Bales
Choosing the right straw bales is crucial for successful planting. Not all straw bales are equal, and selecting the best one can impact plant growth. Consider the type and quality of straw bales to ensure a fruitful gardening experience.
Types Of Straw Bales
Straw bales come in different types. Wheat straw is commonly used for gardening. It is affordable and readily available. Barley straw is another option, known for its durability. Rice straw is less common but works well in certain regions. Each type has unique characteristics. Choose based on availability and your gardening needs.
Importance Of Quality
Quality matters when selecting straw bales. High-quality bales contain fewer seeds. This reduces the risk of weed growth. Look for bales that are tightly packed. Loose bales can fall apart easily, affecting plant support. Check for mold or rot. These can harm plants and reduce yield. Quality straw bales ensure a healthier garden.
Site Selection And Preparation
Conditioning straw bales for planting involves soaking them with water and adding fertilizer. This process prepares the bales to support plant growth. Nutrients in the fertilizer help the straw break down, creating a fertile environment for seeds and seedlings.
Choosing the right site and preparing it properly is a crucial step in straw bale gardening. You might wonder why this matters. The truth is, a little planning can make the difference between thriving plants and disappointing results. Let’s dive into how you can select the ideal location and prepare the ground for your straw bale garden.Ideal Location
Finding the perfect spot for your straw bale garden is like setting the stage for a great performance. The location should receive at least six to eight hours of direct sunlight daily. This ensures your plants have the energy they need to grow strong and healthy. Consider proximity to a water source. Regular watering is essential for straw bales, especially during the conditioning phase. Convenient access to water will make your gardening experience much more enjoyable. Think about drainage as well. A well-drained spot prevents water from pooling around the bales, which can lead to rot. Slightly elevated ground or a gentle slope is often ideal.Preparing The Ground
Once you’ve picked your location, it’s time to prepare the ground. Clear the area of any debris, weeds, or grass that might compete with your plants for nutrients. A clean slate makes all the difference. Lay down a layer of cardboard or landscape fabric. This helps suppress weeds and retains moisture. It also provides a stable base for your bales. Ensure the ground is level. This stability keeps the bales from tipping over and allows even water distribution. Use a simple tool like a rake to achieve this. Think about the layout of your bales. Will you arrange them in a line or a block? Consider how you’ll access each bale for watering and harvesting. A little forethought here saves time and effort later. By investing time in selecting the perfect site and preparing it well, you’re setting your straw bale garden up for success. What insights have you discovered through your own gardening adventures?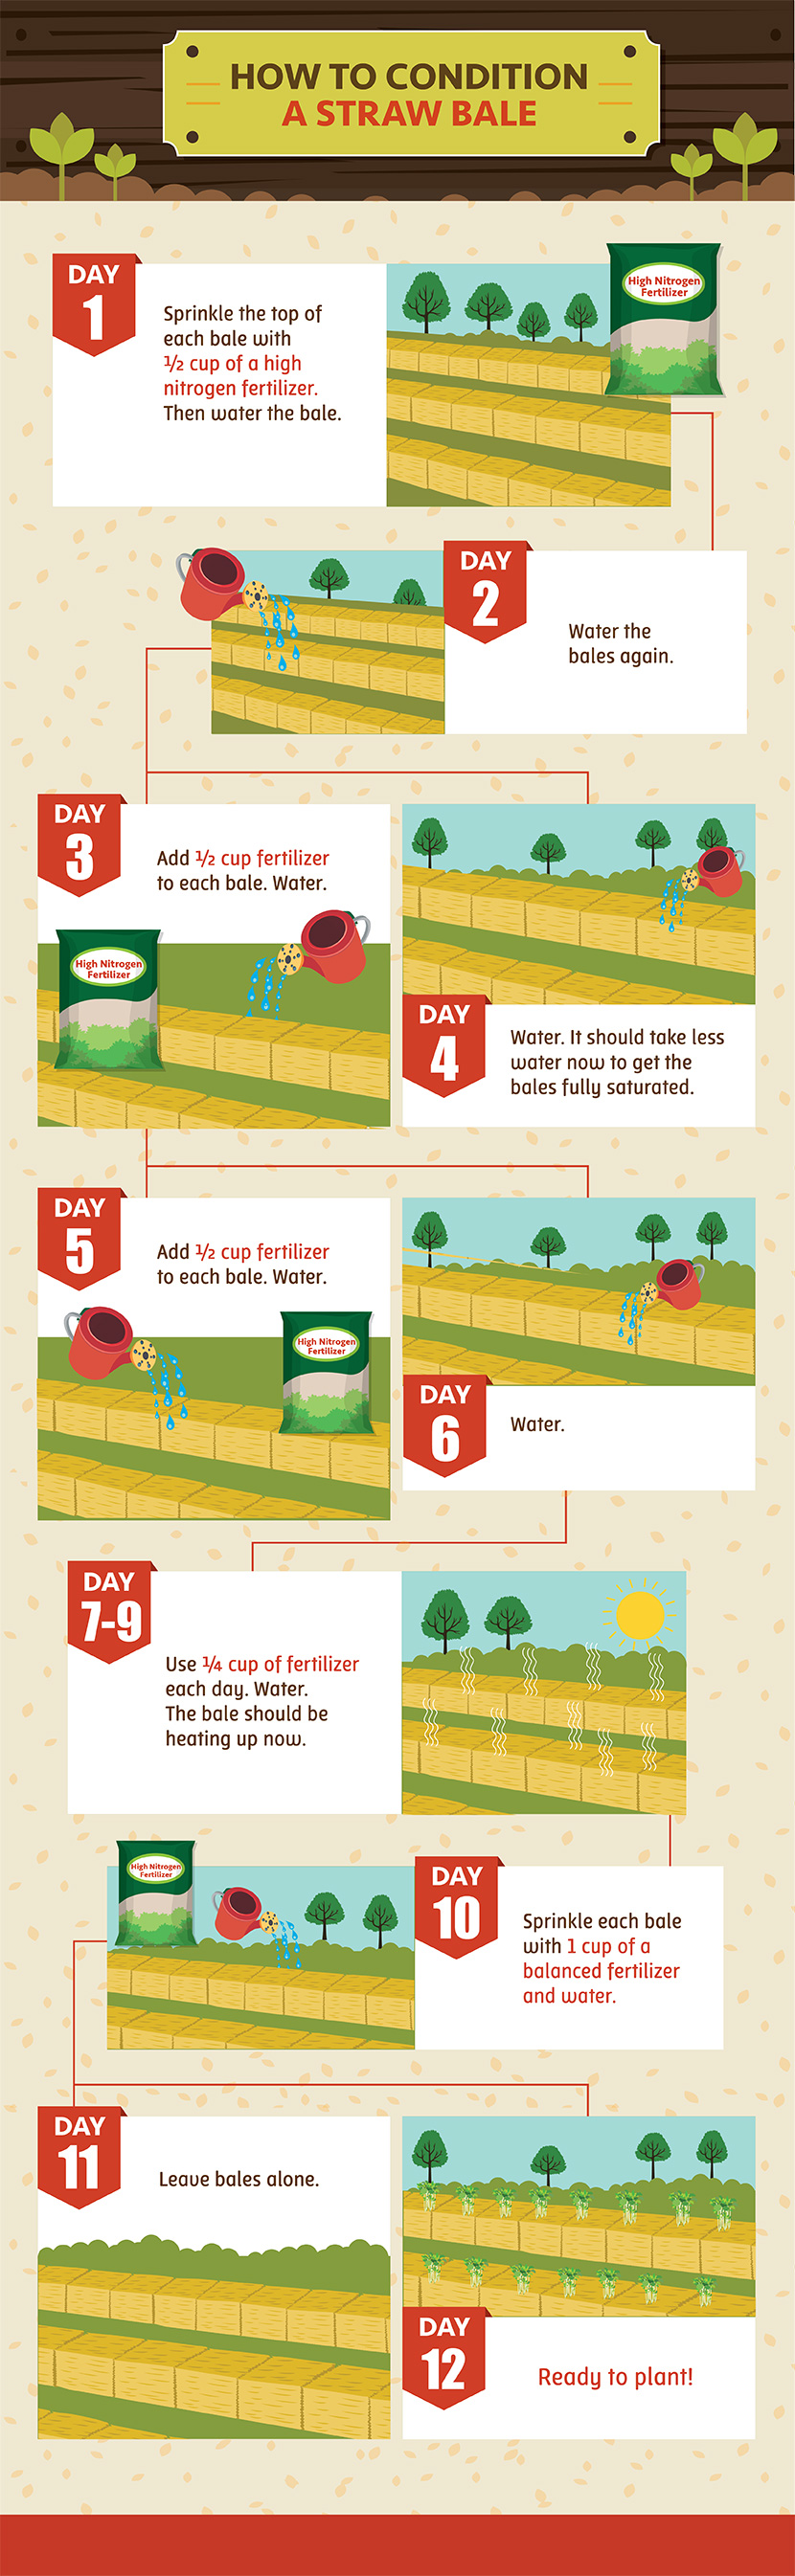
Credit: www.fix.com
Steps To Condition Straw Bales
Conditioning straw bales for planting is a crucial step to ensure they become rich, nurturing beds for your plants. Whether you’re a seasoned gardener or a beginner, understanding these steps can transform your gardening experience. The process involves creating a suitable environment in the bales, allowing them to decompose slightly and become a nutrient-rich medium for your plants. Here’s how you can get started:
Initial Watering
Start by thoroughly soaking the straw bales. This initial watering sets the stage for the conditioning process. Imagine this step as waking up the bales from their dry slumber. Use a hose or a watering can to saturate each bale evenly. You want the water to penetrate deep, reaching every fiber. This moisture kickstarts the decomposition process.
Fertilizing The Bales
Adding fertilizer is your next move. Use a nitrogen-rich fertilizer to boost the decomposition. This is crucial because straw bales lack nutrients initially. Sprinkle the fertilizer generously over the wet bales. Nitrogen acts as food for the microbes that will break down the straw. It’s like feeding your bales a hearty meal that will energize them for plant growth.
Daily Watering Routine
Consistency is key here. Water your bales daily to maintain moisture levels. The goal is to keep them damp, not drenched. This daily routine supports the microbial activity within the bales. Think of it as nurturing a delicate balance. You’re fostering an environment where decomposition can thrive, leading to nutrient-rich bales ready for planting.
Have you ever considered how the simple act of watering can transform ordinary straw into a garden oasis? Conditioning straw bales is not just about following steps; it’s about understanding the rhythm of nature. As you prepare your bales, observe how they change, and feel the anticipation of what they will soon nurture. Are you ready to witness your straw bales spring to life?
Monitoring Bale Temperature
Monitoring the temperature of your straw bale is crucial when conditioning it for planting. Temperature fluctuations indicate whether decomposition is occurring as expected. Keeping an eye on the temperature helps you understand if your bale is ready to support thriving plants. Is your straw bale heating up as it should?
Using A Thermometer
A thermometer is your best friend here. Stick it into the center of the bale and check the reading. You’re looking for temperatures between 120°F and 160°F. This range shows active decomposition, which is essential for conditioning.
Have you ever been surprised by how quickly things heat up? The same goes for your straw bale. If the temperature is too low, add more nitrogen-rich fertilizer. Too high? A little water can bring it down. It’s all about balance.
Signs Of Proper Decomposition
Proper decomposition comes with clear signs. As the temperature stabilizes within the target range, you’ll notice the bale becoming softer and darker. These are signs that the organic materials are breaking down effectively.
You might even see steam rising from the bale. This is a good sign that the internal environment is just right for planting. If the bale smells earthy rather than moldy, you’re on the right track. A healthy smell means the microorganisms are doing their job.
Are you experiencing unexpected results? Perhaps the temperature is not rising or falling as anticipated. It’s important to adjust your strategy based on these observations. Your straw bale’s response to conditioning is your best guide.

Credit: joegardener.com
Planting Techniques
Conditioning straw bales for planting involves soaking them with water for several days. Gradually add fertilizer to speed up decomposition. This process creates a nutrient-rich environment for seedlings.
Planting in straw bales might seem unconventional, but it’s a fantastic technique for those looking to explore gardening without dealing with heavy soil. This method is especially useful for urban gardeners or those with less-than-ideal soil conditions. With a little preparation, straw bales can become the perfect medium for a thriving garden. Let’s dive into the planting techniques that can help you achieve a bountiful harvest.Creating Planting Holes
Start by making planting holes in your conditioned straw bales. Use a sharp tool like a trowel or a small shovel to carve out spaces where your plants will go. The holes should be large enough to accommodate the root ball of the plant you’re introducing. Ensure that these holes are evenly spaced to give each plant enough room to grow. Typically, you’ll want to space them about 6 to 8 inches apart. This spacing allows your plants to breathe and ensures that they won’t compete for nutrients. Once you’ve made the holes, add a handful of quality potting soil or compost to each one. This step provides a nutrient-rich environment for roots to establish themselves quickly. The added soil will also help retain moisture, which is vital for the health of your plants.Best Plants For Straw Bales
Choosing the right plants is crucial for success with straw bale gardening. Not every plant thrives in this environment, but many do exceptionally well. Consider starting with vegetables and herbs, which are popular choices for straw bales. Tomatoes, peppers, and cucumbers are excellent candidates due to their vertical growth habits. These plants can use the bale’s structure for support, maximizing your use of space. Additionally, herbs like basil, parsley, and thyme thrive in straw bales, offering fresh flavors for your kitchen. Flowers can also be a delightful addition to your straw bale garden. Marigolds and petunias are not only beautiful but help attract pollinators, enhancing the productivity of your vegetable plants. Think about what you enjoy eating or seeing in your garden and start with those selections. Have you ever thought about trying something new and seeing vibrant results in your garden? Straw bale planting could be the adventure you’re looking for. By choosing the right plants and creating ideal planting conditions, you’re setting the stage for a successful harvest. With a bit of patience and care, your straw bales will transform into lush, productive garden spaces.Maintaining Straw Bale Gardens
Straw bale gardening offers a unique way to grow plants. It’s ideal for those with limited space. Proper maintenance ensures a healthy garden. With care, straw bales can support a variety of plants. This method requires attention to detail. Let’s explore some key aspects of maintaining straw bale gardens.
Watering Requirements
Straw bales need consistent watering. They dry out faster than soil. Use a soaker hose for even distribution. Water in the morning. This prevents mold and mildew. Check moisture levels daily. Bales should feel damp, not soggy. Proper watering supports plant growth.
Pest And Disease Management
Pests can invade straw bale gardens. Regular checks are crucial. Look for signs of insects and disease. Use natural repellents to protect plants. Neem oil is effective and safe. Remove affected plants immediately. This prevents spreading. Keep the area clean to deter pests.
Troubleshooting Common Issues
Conditioning straw bales for planting offers many benefits. Yet, several common issues can arise during the process. Proper troubleshooting ensures healthy growth and prevents frustration. Let’s explore the solutions to mold and nutrient deficiency problems.
Dealing With Mold
Mold growth is a frequent issue in straw bale gardening. It can harm plant health and affect yield. Mold thrives in overly wet conditions. Ensure proper drainage to limit moisture. Water bales lightly to prevent soggy straw. Use fungicides if mold persists. Organic options are available for eco-friendly gardening.
Ventilation also helps reduce mold. Place bales in airy spots. Avoid tight spaces where air can’t circulate. Sunlight is another crucial factor. Position bales in sunny areas to discourage mold growth. Sunlight dries excess moisture and deters mold spores.
Solving Nutrient Deficiencies
Nutrient deficiencies often impact plant development. Straw bales lack essential nutrients initially. Use fertilizers to enrich the bales. Choose nitrogen-rich fertilizers for early conditioning. Straw needs nitrogen to break down effectively.
Monitor your plants for nutrient signs. Yellow leaves indicate a lack of nitrogen. Apply more nitrogen fertilizer to address the issue. Add phosphorus-rich fertilizers for root growth. Phosphorus supports strong roots and blooming.
Trace elements are essential too. Magnesium and iron deficiencies can stunt growth. Use supplements to balance these minerals. Regularly check your plants to spot deficiency signs early. Timely intervention ensures healthy, thriving plants.

Credit: preparednessmama.com
Frequently Asked Questions
What Is Straw Bale Conditioning?
Straw bale conditioning is a process that prepares bales for planting. It involves moistening and fertilizing to create a hospitable environment for plants. This process kick-starts decomposition, providing nutrients and warmth to seedlings, making it ideal for gardening.
How Long Does Conditioning Take?
Conditioning straw bales typically takes 10 to 14 days. During this period, water and fertilizer are regularly applied. This process ensures the bales become nutrient-rich, allowing successful planting and growth. Monitoring temperature and moisture levels is crucial for effective conditioning.
Why Is Fertilizer Needed For Conditioning?
Fertilizer is essential for conditioning as it accelerates decomposition. It provides necessary nutrients to the straw bales. This nutrient boost transforms the bales into a fertile planting medium. Without fertilizer, the bales might lack the nutrients required for plant growth.
Can I Use Organic Materials For Conditioning?
Yes, organic materials like blood meal or fish emulsion can be used. They are excellent alternatives to chemical fertilizers. These materials enrich the bales, promoting sustainable gardening. Organic conditioning ensures a chemical-free environment for growing healthy plants.
Conclusion
Conditioning straw bales boosts your garden’s success. It creates the perfect environment for plants. Straw bales offer excellent drainage and root support. Ensure they are moist and properly fertilized. This prepares them for planting. Regular watering keeps them in good shape.
Straw bale gardening is a simple, effective method. It’s suitable for beginners and experts alike. Enjoy the benefits of healthy, thriving plants. With patience, your garden will flourish beautifully. Happy planting!